9 Essential Steps for Planning Your Dream Build | Part 2

“By failing to prepare, you are preparing to fail.”
-Benjamin Franklin
One can have many reasons when deciding to start a DIY van build. Ours was born out of the need and wants to travel. Before March 2020, we enjoyed traveling abroad several times a year and a handful of domestic trips.
Our plan had been scheduled for a few more years, but that all changed when the world changed. We made the decision; why wait till later?
A DIY van build can be considered a daunting task or an adventure, and many shades exist. For me, it started out as an adventure, but at times certainly feels like a daunting task.
Come along for the journey.
Your DIY Van Build
In my opinion, the most crucial part of the build is the planning, an area that I personally was lacking when we decided to start our ‘Adventure.’ After a needed course correction, we had a plan and were ready to move to the action phase.
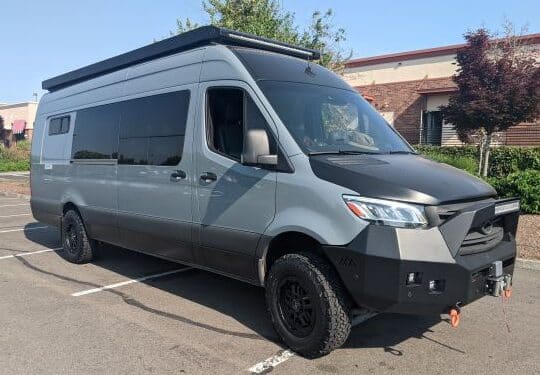
If you do not already have a van, your first step is to decide on which van you’d like to go with. Questions you’ll have to ask yourself, where will you be going? What types of climates will you be in? City or the wilderness? How many people will be in the van? Is Interior height needed or wanted? How much free space do you want?
Once you understand your basic requirements, you can set out to look for a van. Not all manufacturers are the same. Here in the US, we have Dodge, Ford, Nissan, Mercedes, etc. They all offer something different that may or may not appeal to you. Interior heights, lengths, whether a four-wheel drive is an option, and so on.
Another aspect to think about is whether you want new or used. Obviously, at first, a used vehicle will be a cheaper hurdle than a brand-new one off the lot. Remember, you do not always know what a used one has been through. It can very quickly cost you more in no time at all. New ones typically have warranties or maintenance programs you can utilize if needed.
Now that you have the van and are ready to take the next step let’s start planning your DIY van build.
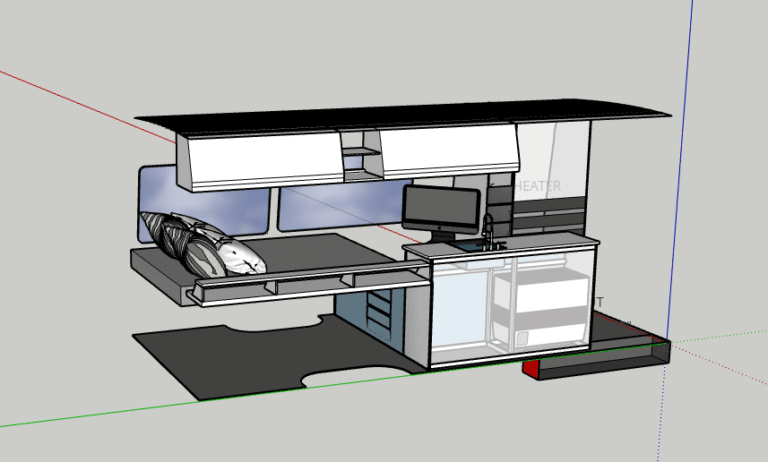
The Layout
Okay, you have the van. Now what? Just start tearing things apart and hope for the best. Not really. You’ll want to plan your DIY van build in as much detail as possible. By now, you should know what you will be doing with the van and how many people it will need to accommodate.
So, considering all that info, you can design your layout. Where will you be sleeping, hanging out, cooking, bathroom options, etc.?
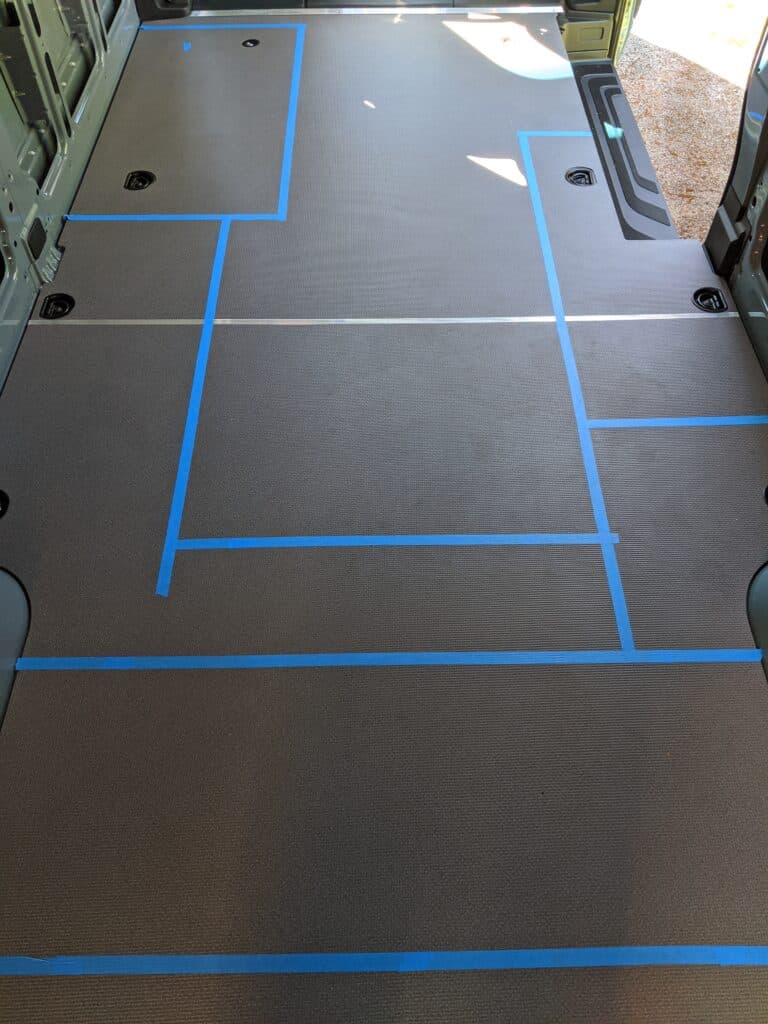
I personally like to use painter’s tape on the floor for the footprint of various components in the van. We had the bed, electrical, water tanks, kitchen, seating, and bathroom area to tape off. This gave us a good sense of the space available to move around inside and whether some items could be larger or needed to be smaller.
Next was deciding the height of these components. We went with a raised bed to allow for garage space underneath. In the garage, we wanted to be tall enough to store our bikes if needed but did not want the bed so tall that we could not sit straight up without hitting our heads. This is one area in which the interior height of the van will come into play.
During this layout process, you’ll want to think about where your electrical equipment, like your batteries, chargers, inverters, etc., will be installed. As well as your freshwater tank(s). Be mindful of your weight distribution throughout the space.
Once you have an idea of where everything will be going, you can do a rough sketch of your plan. Make several copies and start drawing your wiring and plumbing routes. For wiring, you’ll have to consider wall and ceiling space.
In some vans, you can run the wires from front to back in the walls and ceiling; in others, you must make modifications. For plumbing, the least amount of fittings, the better. Adding measurements to your drawings will help when it comes time to order supplies.
Windows
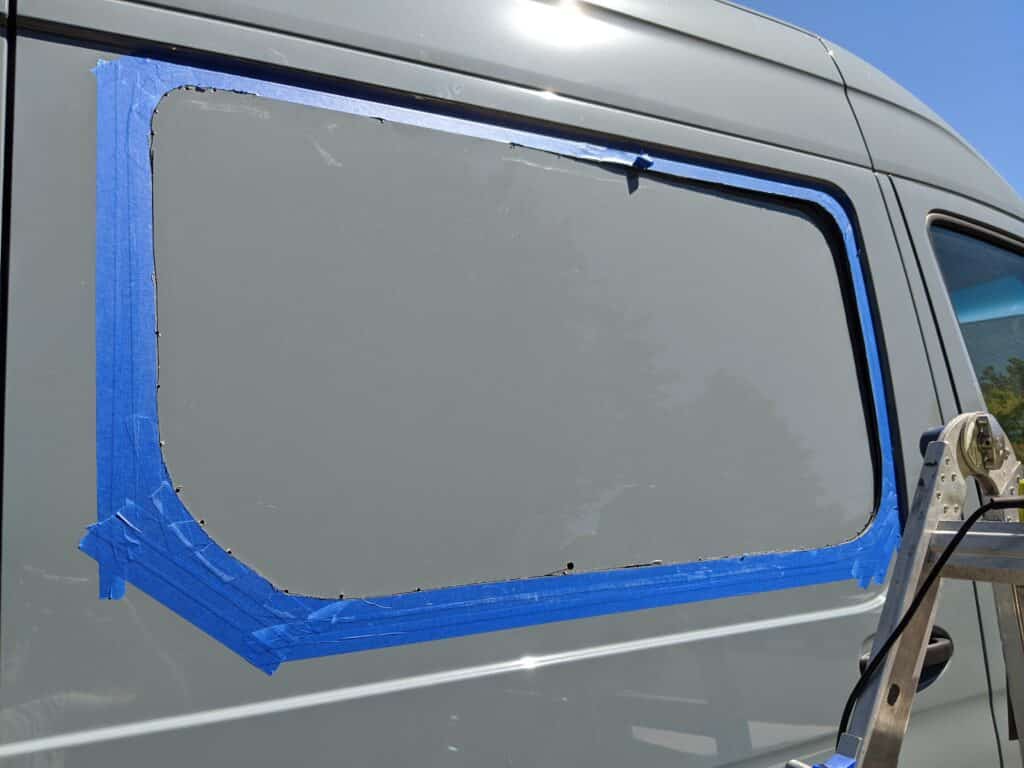
There are pros and cons to windows. Windows are not good insulators, but a large window is nice when you have great views outside. When it comes to windows, there are a few manufacturers to choose from. My tip here would be to read reviews on quality and customer service.
Also worth noting, if in your DIY van build you are uncomfortable cutting into the sides of your van, companies out there will install these windows for you. It could be worth your investment.
You’ll buy them specifically for your van so that they will fit and complement the contours of your van. Ours was a cargo van from the factory, so we had no windows behind the cab. We went with five windows and a sunroof, so we get a lot of light inside and can get some amazing views, but we also deal with the heat and the cold they can transfer.
With windows, you will want shades. Since windows are not good insulators, you’ll want to add shades. Whether in a cold or hot climate, the proper shades will help with temperature control. And unless you like being on full display, privacy is another good reason.
Climate Control

There are several options out on the market for heating and cooling your van. For us personally and how we use the van, we went with a heated floor system from Van Life Tech. We have two dogs that travel with us in the winter and when we are out on the slopes, we like to know our dogs are staying warm.
Plus, it is nice and toasty inside when we return to the van. We also like to hang out in warmer weather so an air conditioning system was necessary. We went with a roof-mounted system and so far, it seems to be doing the trick.
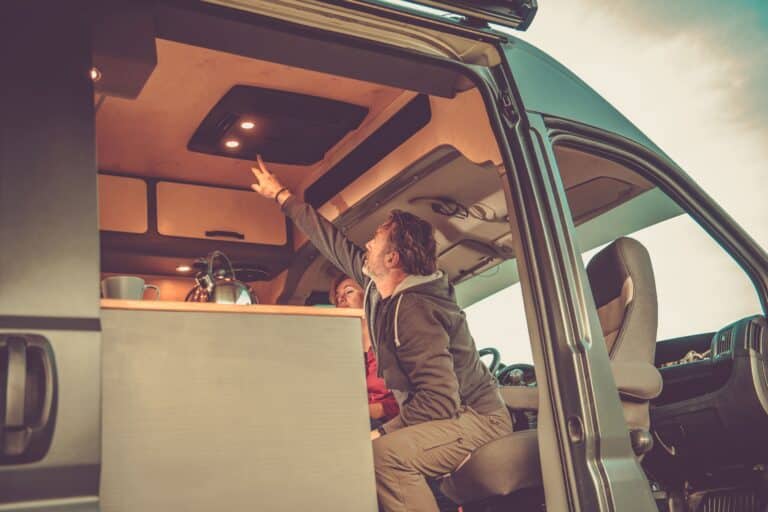
If you will be cooking in the van, it is a good idea to have some sort of way to get air from the inside to the outside, and you’ll want some sort of exhaust fan. Breathing can create excess heat and moisture depending on how many people you have in the van. So you’ll need a way to exhaust air from the interior, like a MaxxAir fan or MaxxAir Dome.
We started out with a MaxxAir and I was super impressed with it; it would move some serious air. When we swapped out the fan for the AC unit, we had to install a MaxxAir Dome. The dome works okay, but I would have preferred having variable speed control.
Insulation

This is an area we are still struggling with. Since we chase snow in the winter and beach it in the summer months, we have yet to find an insulating product that works well in both. After what I thought was a lot of research, I decided to go with Havelock Wool.
Havelock comes from sheep; it keeps them warm, right? Yes, but it does come from sheep, an animal. So it smells like an animal, which I knew would be the case.
The smell was rather strong; if you are into barn smells, this is a great product for you. It is easy to work with and stuff into all the small nooks and crannies. However, something you will hear often is, yeah, it smells, but it does go away.
Yeah right. When it gets warm outside and the outside panels of the van start to heat, you will start smelling that good ‘ole barn smell again.
The other downside for us, and a major one, is that my wife was having asthma attacks because of it. So, the Havelock was not around for very long. It was removed maybe fifteen months ago, and to this day, we get faint whiffs of it.
The next product I went with was Rockwool, non-animal and not fiberglass. It was easy to work with and stuff into hard-to-reach areas. It does give off dust particulate when working with it, so you’ll want to ensure you are wearing a proper mask. It does a good job of insulating the walls and ceilings for the most part.
In colder months outside, you’ll have warmth on the inside and warm bodies exhaling warm air inside. This creates extra humidity in the interior air and, as a result, a build-up of moisture on your windows and the interior of your wall and ceiling panels.
One way to combat this is through ventilation, cracking some windows, and running your exhaust fan to move the excess moisture out. It sounds great, but if you are trying to maintain an interior temperature to keep everybody happy, it can be a losing battle.
One area we noticed excess moisture was in the cavity above the headliner in the cab, we had insulation in there, but it was not up to the task. I removed the Rockwool and went with a spray foam product. A layer around 3-4 inches thick has greatly reduced the amount of water droplet build-up in that area, but by no means has it eliminated it.
So, I’m being truthful when I say this is one area we are still struggling with. I do not have a solid answer, if you do, please message me.
Electrical
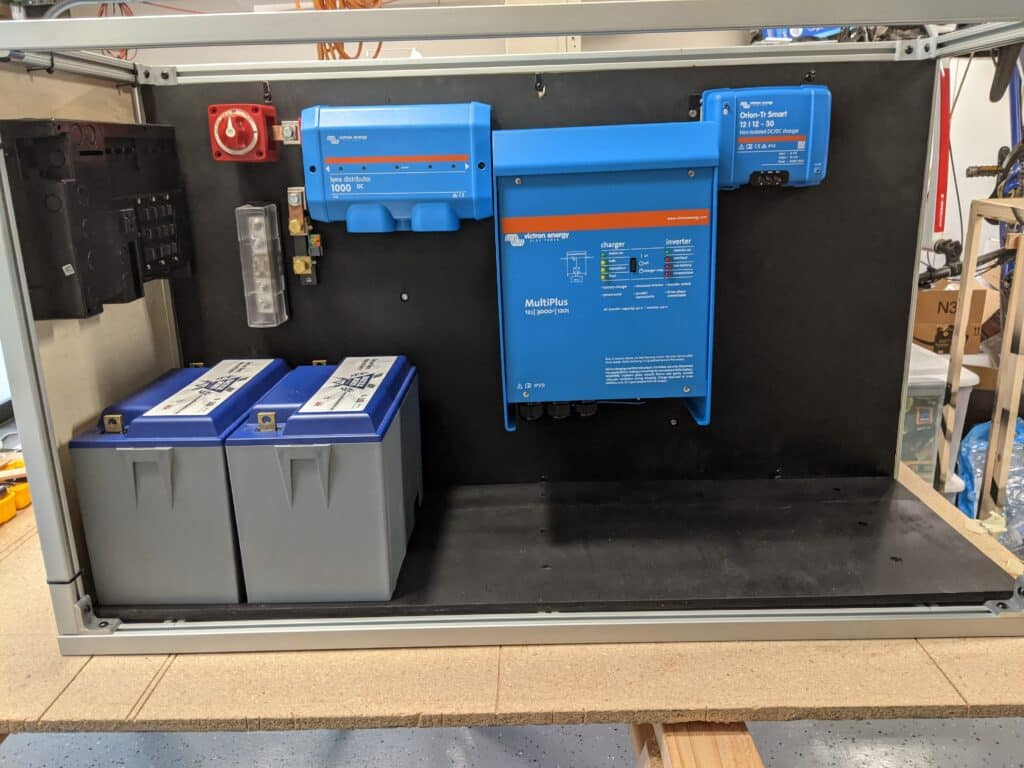
Back in your planning phase, you decided what you would have in the van. Items like a fridge, fans, heaters, power outlets, pumps, lights, shower, and a toilet. All sorts of things will require power. Some are DC and some are AC-supplied power. In either case, you’ll need a house battery bank. How many batteries you’ll need depends on your planned consumption.
You can perform a power audit to determine your needs. You would have already decided where this equipment will be placed in your van, so now you must decide which products you’ll use to power all your gadgets. You can see the products we use and recommend here.
Now that you know the what and where you’ll need to wire it. Take your time in this part of your DIY van build. Once your build is completed, it may not be that easy to go back in and fix something or change it. Map it and keep the diagram handy.
You will need to know where your wires are when it comes time to install your cabinets, wall and ceiling panels, or anything that will need to be screwed or bolted to the van.
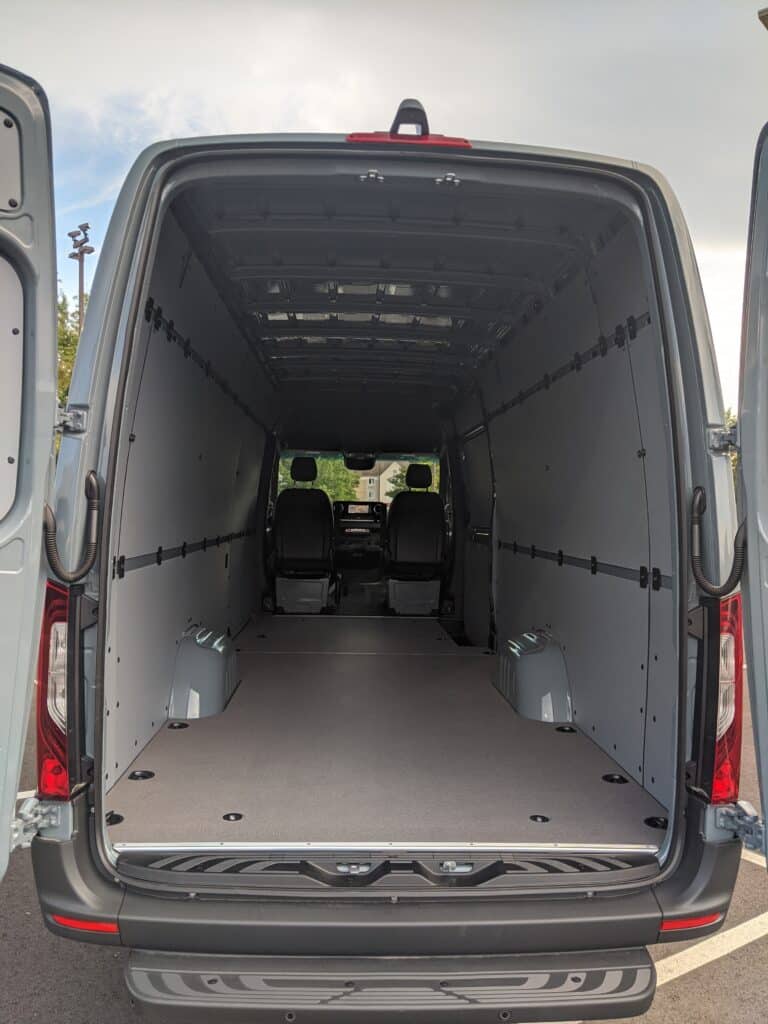
Walls and Ceiling Panels
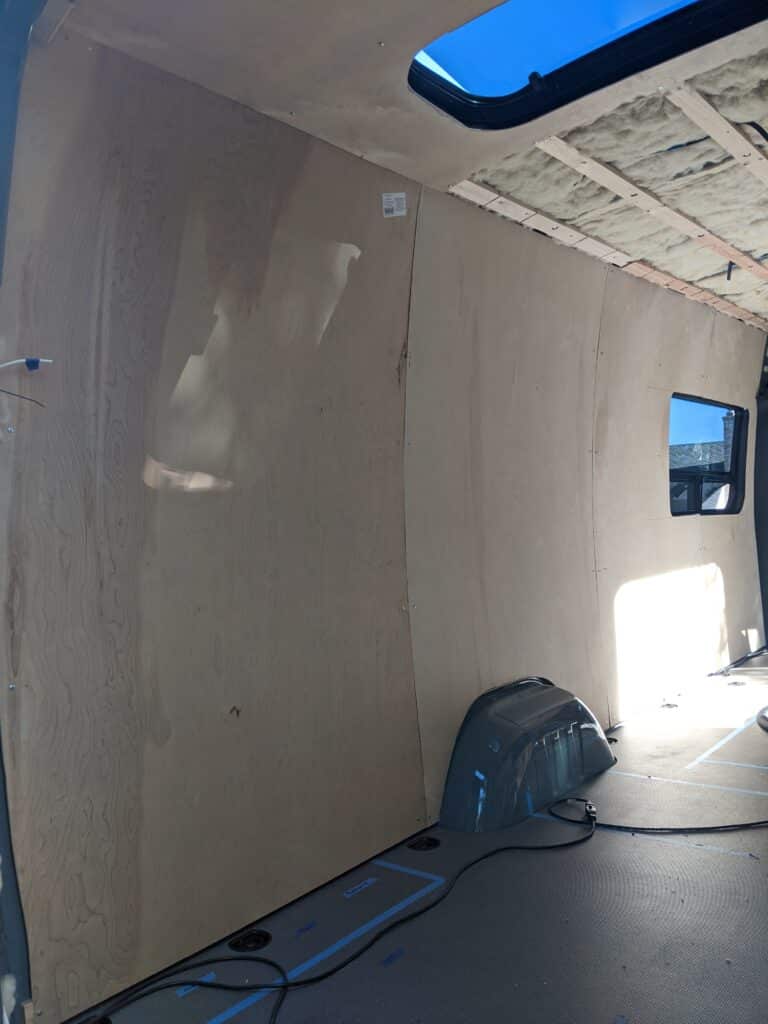
There are many ideas on what to use for your interior paneling. It is one serious rabbit hole you can go down. We went with RB Components wall and ceiling panels. They were designed and cut exactly to match the interior of our van and look awesome.
Now there is one drawback to this, if you installed windows, you will have to do the window cutouts in the panels and do the upholstering of that panel yourself. They did have one option for a window; if you have a window behind the driver, you can get one ready to go from them. The panels are also pre-drilled, which makes installation a lot easier.
I had cut my own panels and went with a Sunbrella fabric to begin with. I must be honest; they just did not look that great. If it’s a skill you have, go for it, but in my opinion, they are worth the money to have a professional do it.
Plumbing

There are a couple of ways you can go in this arena. Install freshwater tanks mounted somewhere inside the van or underneath the exterior of the van. Another option is to install a water jug underneath your kitchen counter and pump water from it.
In either case, you’ll need to plumb for water transfer. PEX is probably the easiest product to use, the pipe is cheap and the fittings are spendy. But they are worth the cost for how easy they are to use. The push-on style is simple; just ensure you install the pipe correctly.
Another tank to consider is a gray water tank, which will hold your sink water and shower, too, if you have one. Again this can be an interior tank or an external one, personal preference, really. Ours is mounted underneath the van, mainly because we went with a 20gal, and there was a spot for it underneath.
The downside is that in Colorado, things tend to freeze in the winter months. We are working on installing heat tape to use during extremely cold times to keep things moving along down there.
Flooring
This is an area we’ve also gone through a few different products. The first option we went with was an LVP product; it was waterproof and supposed to be scratch resistant. Well, it did not take much at all and it had scratches all over it, plus the dogs would slide all over the place on an incline or hard stop.
So, out it went, next please. Then we bought rubber squares, and while they were nice and comfy, they were a little thick. Cleaning them was a bit more challenging but not too bad.
So, we thought we had found a winner, so we bought a roll of it to eliminate any seams. We found a slightly thinner product, used the squares to make a template, and installed the product.
It looked nice enough, the dogs did not slide around, and the heated floors transferred heat nicely. But keeping them clean became a pain. You could not sweep it easily, so you used the vacuum every time. Plus, it was not waterproof. Next!
I decided to try out vinyl planks again but did a little more research and found one that was waterproof and scratch-resistant. I installed it going from the driver’s side to the passenger’s side so the embossing acts a little bit as a grip for the dogs. So far, it is a win.
Cabinets / Components
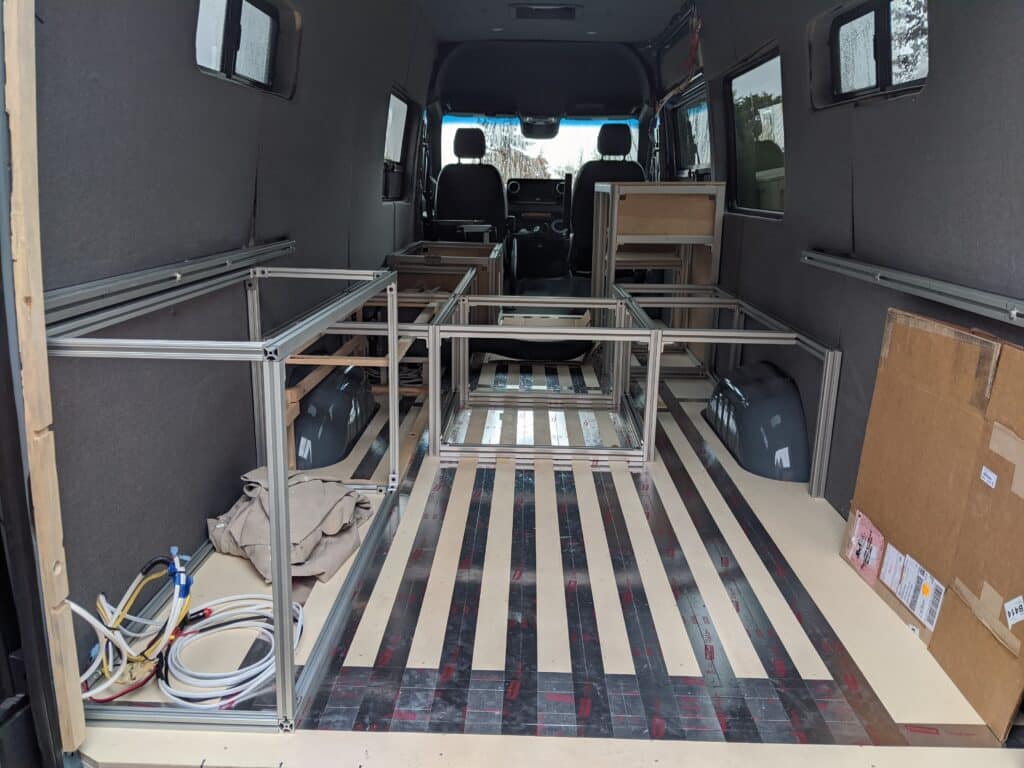
I had decided to use 80/20 due to its strength, weight, looks, and versatility. If you are any good at woodworking, wood looks nice too. I’m not that great with woodworking so 80/20 had my vote. All our framing is done with 80/20, primarily 1.5”, but our electrical component is 1”.
Another nice aspect of 80/20 is how modular it can be. You can build all your components and then start bolting them together inside the van. We chose to go with bamboo paneling to finish our cabinetry. Natural bamboo and the color 80/20 complement each other very well.
Conclusion
As you can see, there are many different options when planning your DIY van build. It can be a fantastic journey and allows you to express your style and artistic flair.
Whether you are building your van for a weekend warrior mobile, road-tripping ride, or you have no plan for it and thought it would be fun, having a plan for your DIY van build can help smooth out the bumps along the way.
During your build, there will be hiccups; when this happens, take a break and do something else for a little while. Once your head has cleared, go back to your build, and usually, you’ll see a solution. If that does not work, there is always YouTube and Google.
I would like to thank:
I have no affiliation with these companies. Just grateful for their products and input during our build.
Van Life Tech
Tiny Watts
Disclosure
This site may contain affiliate links to products. At no cost to you, we may receive a commission for purchases made through these links. If you do make a purchase, we cannot thank you enough. It keeps our fridge stocked with caviar and champagne.
Just kidding, of course, but seriously we truly appreciate it when you use our links to make your purchases.